Showing posts with label Before and after. Show all posts

Tuesday, April 12

Sobe Spring recipe

Found at an estate sale last November and stashed away, several spools of white flower lace...
Some "played with " 

 One of my guilty pleasures: Sobe Yumberry Pomegranate
My ribbon stash 
And the weather finally allowing for spray painting outside 

Chop off the top

For some upcycling goodness

A fun container for my crayon

A cheerful straw holder for our next BBQ party


A sweet little vase to put those orphaned blue and white branches


Oops, I'm out of Sobe bottles to upcycle.


Visit thecsiproject.com


Wednesday, February 16

Little makeover

Recently, I stumbled upon an Etsy store that sells ironing board covers. Looking at those cute covers make me more painfully aware about my ironing board being in great need of a makeover.

OK ... it's eww, not from dirt but from a couple of burn marks and goop from Wonderunder, hem tape and other interfacing oopsies. That doesn't wash off. Paying $15 for an ugly new ironing board cover.... nope, paying $25 for a cute one, I don't think so. So I made one. 

I just used the ugly one as a pattern and cut 2 layers of cotton quilt batting and the top fabric to the same size.  I then stitched all 3 layers together and then used a left over 3" strip from a quilt binding to make the channel. Then I made a cord out of green bias tape stitched together lengthwise that I threaded through the channel and tada this is the new look : 


Not as fancy as those I saw on Etsy, but prettier than a store bought one and  a vast improvement over the sad look of the previous cover 
Bonus: only took an hour. Oh and it cost under $2. 
- Left over cotton batting for padding : $0.50
- Left over green stripped for channel : $1.25
- Donated pink stripped fabric - free
- Donated green bias tape - free
- Donated thread
Oh I so like friend sewer/quilters that de-stash after finishing a project. And I like my ironing board a lot more too. 


One last time side by side : 


And here it is in action with my latest project 
Yes a new quilt is brewing
120 blocks at the ready

Tuesday, October 19

A little visit - Basement makeover


This nasty bug has been stopping me dead in my tracks. No projects going right now. Between the constant coughing, my body aching all over and the on and off fever and headache, I haven't spent  any time sewing or crafting since last thursday. Hopefully I'll bee back on my feet soon. By the way, many many thanks to all that sent me get well wishes. Good vibes always help. 

So no new creations these days. But I do have something to show you. The transformation or our little townhouse's basement. We bought the house in 2004, in as-is conditions, knowing fully not much home improvement had been done since it was first built in 1973. These are pictures of the basement I took when we did our walkthrough just before closing, with the previous owner's furniture.
The wall panelling screams 70's: a faux wood effect laminate on really thin particleboard. The carpet had seen better days but was still "serviceable". Let's not talk about the horrible vertical blade shades or the hideous lighting.


After moving in though, the basement was way down in our priority list. We had 3 bathrooms, all the bedrooms and the kitchen to worry about first. So all we did there was to fix the bathroom (not shown) and slap 2 coats of primer and 2 coats of paint on the ugly panelling. I don't have any pictures of the intermediate stage because we ended up letting a couple of friends stay there since we didn't really need the space. In october 2007, our friends moved to Texas. By then the family had grown. We were happy to reclaim the space but a bit worn out by all the other home improvement projects we had already taken on. So we cleared it up and it stayed empty and unused until the summer of 2009. 

That's when we literally gutted the whole room

Waterproofing, wiring, insulation redone 


Wall boarding, priming and painting
Check out the recessed lights! 


New floors yes the hubby and I did all of that except for the wall boarding!


A few Ikea parties later this is how it looks like now

One side family room


One side craft room with lots of storage


This is where I hide to craft while my little bug plays either in the family room side or right outside on the back patio (we can't really call a 22x16 patio a backyard really) or after she is tucked in while my hubby indulges in his geeky online games. The hubby installed under the cabinets lights for me, my sewing table is a 'hack': kitchen countertop with adjustable desk legs. The counter above the cabinets is just the perfect height for cutting fabrics without breaking my back. 


Friday, September 17

Trashformation - Doll cradle

Yet more stashbusting going on here. 


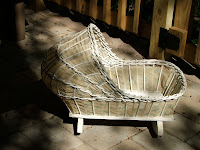
My mother in law picked up this doll cradle at an antique store. A cute design but it was in a pitiful shape. Like most things you pick out in antique stores, it was dirty, dusty, a bit smelly (ugh) and in dire need of some TLC before it could be played with. 


After good scrubbing, years of dirt and grime off, it already looks happier!

Primer and paint - I have to go through my stash of spray paint !! 


Much better already!

Then I found some coordinating lavender fabrics in my stash and a bit of lace to make some new bedding: Mattress, pillow and comforter


I used the old fabric liners as pattern and some left over sheer curtain cloth and satin blanket binding for the bows:


So there is the before and after

And another one

Needless to say the cradle was immediately adopted by my little bug. Evidently, it's just the right size for her beloved doll Princess Fiona.

Saturday, August 7

Tutorial - Handmade daisy

For this project you will need :
- 1 40"x5" fabric strip
- Matching thread
- Sewing machine (optional)
- Pinking scissors
- 1 Button


* Fold the strip of fabric in half and press
* Mark arches like in the picture above


* Stitch along the marks 
* With the pinking scissors, cut the individual petal
* Turn over and iron each petal


* Fold the straight edge of each petal in an accordion and stitch through
* Continue stringing petals until you reach the desired shape
* Secure the thread


Add a button for the center 
Voilà!


Click here to see how I used this one

Trendy Crafter Button

You may also like...