Showing posts with label Doll clothes. Show all posts

Sunday, November 18

Sewing spree for Princess Fiona

I had been a while since Bug's Princess Fiona had gotten a new outfit. This oversight is now corrected. I dug up remnants of voile from another project, a cute scrap of paisley and some tulle for a 2-day sewing spree. 

Princess Fiona now has:

A ruffled multi-tiered dress

A long skirt and matching blouse

Purple pants

A matching vest

And a tutu. 

I think Fiona is set for a while and Bug is very happy with the wardrobe additions

Thursday, January 12

Vintage doll dress

I recently met the owner of an antique shop in nearby Ellicott City and we got into talking about handcrafting and sewing. She repairs vintage dolls and asked me whether I could make custom clothes  for her clients. I thought It would be a fun change in my regular sewing routine and here is the first commission completed: A blessing dress for a 1923 Grace Putnam Bye-Lo baby doll. 

 With lots of precautions and a very clear warning to Bug that she was not to touch this baby because it was highly breakable and precious, I brought the cutie to my studio, researched period clothing and meshed the results with the doll's owner's request: A girl baby, white or cream blessing dress, long enough to cover the feet but not too long. I went for long balloon sleeves on a regular bodice and a flared skirt, trimmed with lace along with ruffled pantaloons and a matching hat.
The store owner was quite happy with the result and will probably give me more commissions in the future.


Look how peaceful she looks ... how precious :)


Monday, July 25

Fiona's fashions - A pleated skirt

Princess Fiona's wardrobe keeps expanding. I like being able to use those cute prints from my scrap bin. And Bug loves Princess Fiona to look stylish. I'm still struggling with making tops,  making sleeves (that fit) this small is a challenge and there is the extra complication to make it kid friendly. I'm working on it. 
In the mean time, Princess Fiona is getting a new skirt. 

And now that I've figured out how to make pleats, Bug may get a cute new skirt too

Monday, June 6

Princess Fiona's - A summer dress


I have been informed/instructed by Bug about Princess Fiona needing some summer dresses. This is the first one that came out of the sweatshop studio. Bug is of course expecting a couple more.

I still had a few scraps of the toile blouse I recycled into a dress for Bug.


Just about enough for a dress for Fiona. I went for a simple pillowcase dress to avoid having to deal with sleeves. It turned just a bit short so I ended up adding a ruffle at the bottom

And for Bug's convenience (and mine) I used a fabric covered elastic instead of a ribbon tie. Easy to put on and off without mommy's help. Bug loves it "Oh! La jolie robe" she went. I think Fiona will get more dresses on the same basic design. It's so cute I'd make some for Bug too but her closet is already full of pretty dresses thanks to Grandma.

Tuesday, March 22

Princess Fiona's Spring wardrobe

Princess Fiona hasn't gotten a new outfit in a long while. Well that was until last weekend. I started sewing a summer dress for my little bug and there was just enough scraps to make a couple little outfits. I wish I was a bit better at handling knits. Only one top turned out "wearable", the other 2... let's say I'm learning from my mistakes :).  


Sunday, March 20

What I've been up to - Week 12

First if you haven't entered yet, don't forget to sign up for the $40 CSN gift card giveaway open until midnight tonight. It does looks like I'm about to break 400 followers and if that happens, there will be 2 winners, one for the gift card and one for a special handmade gift made by yours truly.


A lot of ruffles this week, unfortunately you only get a sneak peek today.  I also started cutting all my scraps in 5" squares to get started on a I-Spy quilt for my little bug. I've been gathering fabrics for a couple of months and I have now about 50 different swatches but I ended up cutting closer to 90 squares since some could yield more than one. I'm sure I'll find a taker for the extra squares :).


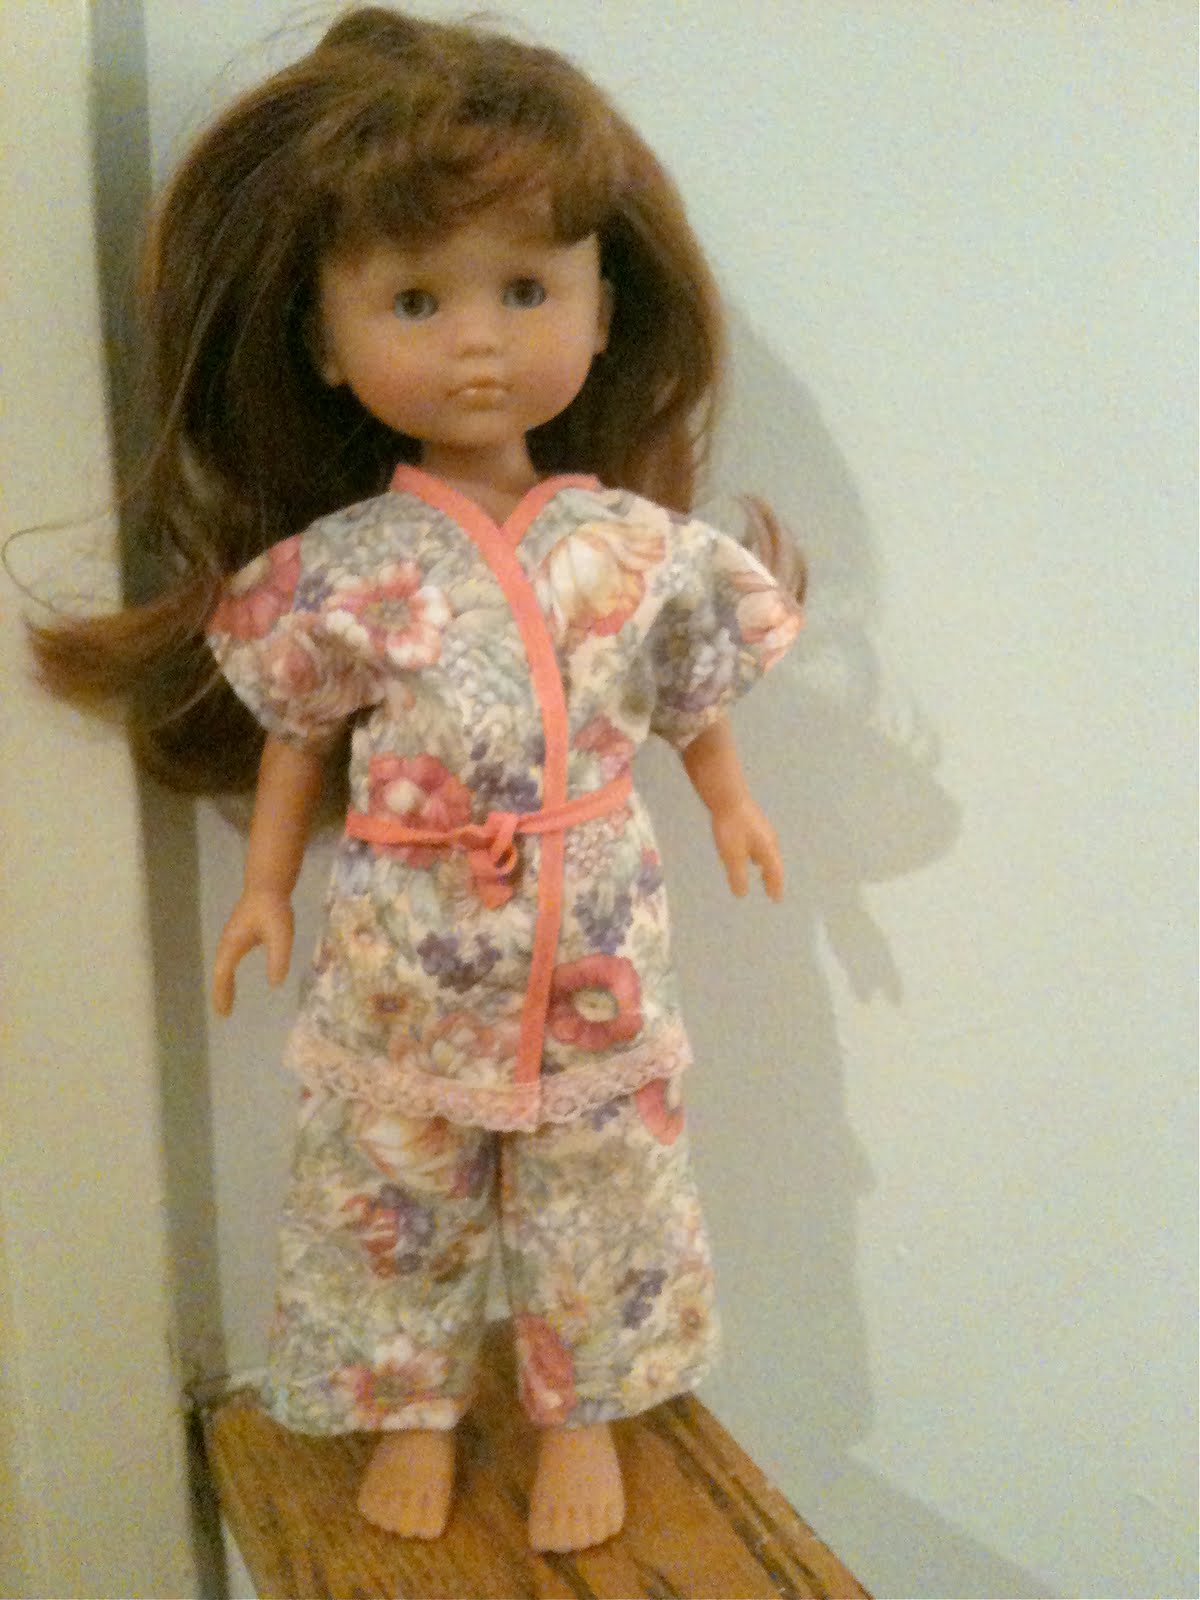
I also finished a cute skirt and started on 3 summer dresses (yes 3 - must be Spring fever kicking in) for my little bug and some season appropriate clothes for Princess Fiona.


Spring cleaning is now finished in the studio. All my fabrics, notions and other craft supplies are now inventoried and accounted for. Bring it on Spring Stashbust! Two more days before the shopping ban starts. If you haven't signed up yet hurry up ! 31 bloggers already have.

A bit of jewelry also came on the menu with this spring fresh necklace, and two more in the works. 

 It goes beautifully with my new lacy shirt

On the family front, things are going rather well all things considered. My FIL's chemo is going rather smoothly and he's enjoying the quilt very much. As he put it himself, losing all that weight has the benefit of having fit back in the same size clothes he wore when he got married, but the lost padding makes him feel cold a lot more. Yay for a really good idea. 

Next weekend I'll be out of town for a much anticipated sewing retreat. 3 days of nothing but sewing, in the good company of wonderful friends, and dotted by fabulous meals and a bit of horsing around. No housework, no kids, no hubbies. My 3 days of heaven.

What have you been up to ?

Saturday, September 25

Fall fashion for Princess Fiona

School is back in session, the nights are cooler and while we are still enjoying wonderful and cosy warmth in the afternoons, the truth is, fall is upon us. Princess Fiona did not have any appropriate outfits for the season and the cold ahead. 
A little more stashbusting - Well only a little because this didn't use much fabric at all obviously.  But the scraps I used for these, are from some of my favorites projects: A summer short overalls I made for my little bug a couple of years back and a cosy blanket/play mat I made for one of my nieces. 


Sunday, July 25

Tutorial - Doll Kimono - Part 2


You can find the first part of the tutorial along with the supply list here
* Use an existing piece of doll clothing to evaluate the length / width of fabric needed
* Fold the fabric as shown so that the top 2 flaps overlap enough for closure of the kimono


* Place again the existing doll top on your fabric and trace the side adding extra for sewing allowance/ loose fit
* Mark the center of the back and the position of the sleeve on the top of the back
* Clip off the sides with pinking scissors (including what will be the end of the sleeves)
* Clip off a shallow V on the back using the marks on the back 
 

* Cut the 2 fronts to form the V-neck collar


* Stitch the arms and sides
* Hem the sleeves

* Apply bias tape all around (no pictures sorry - they all came out blurry) 
 * Using a seam reaper, open a little section of the side seam at waist height to insert the belt (Bias tape stitched together)

And there is Princess Fiona modeling the result

And the pink version of the same design


Trendy Crafter Button


Friday, July 23

Tutorial - Doll Kimono - Part 1


This is how to make a cute kimono outfit for a 13" Tall Les Cheries doll. You could use the same method for a taller doll with of course more fabric.

You will need:
Doll outfit for size
- 1 fat quarter
- Coordinating thread
- Pinking scissors
- Measuring tape
- Fabric marking crayon
- Elastic band
- Bias tape
- Sewing machine


* Cut off the selvage
* Fold your fat quarter in 2 lengthwise and lay the doll's pants on top
Those pants are about 2 inches wide but tight fitting on the doll so I chose to add 1 inch to the finished width to achieve the kimono pant effect.
* Cut 2 strips 3 inches wide each and fold them in half right sides together
* Lay the pants on top of the fabric strip again and trace the outline with fabric marking crayon
* Cut the fabric with pinking scissors leaving 3/8 allowance around the outline

* Sew the inside seams of each pant leg wrong side together
* Hem the bottoms
* Sew the outside seams of each pant leg wrong side together
* Turn the legs over and sew the 2 legs together

Almost there
* Hem the waist leaving a channel wide enough to put elastic through it - Leave about 1/2 inch (1cm) unstitched, preferably in the back
* Measure the waist of the doll and cut a piece of elastic band about 1/2 inch shorter than your measurement.
* Thread the elastic in the waist channel (I use a safety pin to guide the elastic through)
* Stitch the ends of the elastic together and finish the waist seam

You are done !


Update:


UndertheTableandDreaming

Monday, July 19

Princess sleepwear

Today my daughter was anxious to get home. She wanted to play with Princess Fiona. We went through several outfits before dinner but when came bedtime, I was informed by my daughter that our poor princess lacked proper sleepwear. So I had to whip together this cute pajama set. I used the pair of pants that she came with to cut a doll size pattern for the elastic waist bottoms and  then put together a kimono style top with a bias tape finished edge and lace trim. 


Fiona's wardrobe is putting a dent in my fabric scrap pile/trim stash. And I'm having tons of fun doing this!

Monday, July 12

Les Cheries - Summer Fashion for Clara

This is Clara out of the box

A tennis dress and a sun dress
Purple skirt and Lavender outfit


And a formal skirt and matching top

All made with love by Mom


Update - Clara has been a hit. Her new name 'Princes Fiona'. Can you say too much Shreck !

You may also like...